How to Clean and Oil Andis Pet Clippers
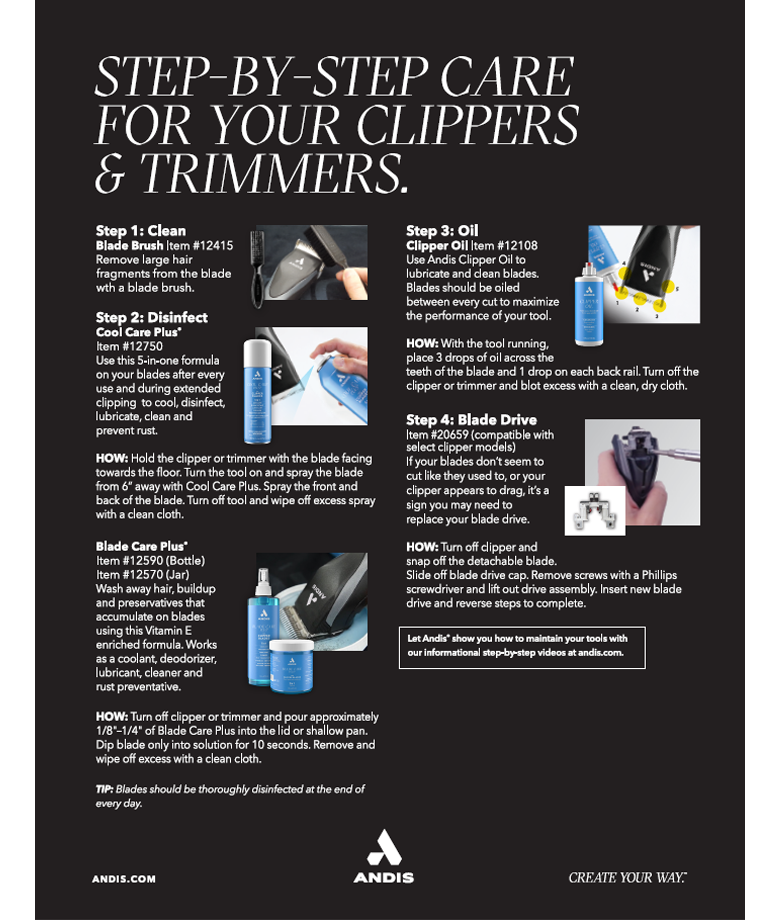
Andis pet clippers range from snap-off home trimmers to professional AGC2 and Pulse ZR II models with detachable UltraEdge or CeramicEdge blades. The blade may be removed for brushing, approved blade-care treatment and oiling, but the clipper housing, cord, battery and charging contacts are not wash-basin parts. Andis's maintenance guidance emphasizes removing hair, cleaning or disinfecting blades with the appropriate product, drying them and applying clipper oil to reduce heat, friction, rust and wear. Identify the model and blade system before pulling on any component because adjustable, five-in-one and detachable blades release differently.
Published · Updated
Primary reference: Andis official clipper and trimmer care guide. Always check the manual for your exact model.
Quick reference
- Power
- Switch off, unplug or isolate the battery before cleaning.
- Dry clean
- Brush hair from blade teeth, hinge, guards and housing first.
- Blade care
- Use an Andis-approved cleaner, dry thoroughly and oil designated points.
- Keep dry
- Housing, motor, switch, cord, battery and charging contacts.
- Stop if
- The blade chatters, pulls, has chipped teeth or heats rapidly.
What you will need
- Andis use-and-care document for the exact clipper
- Andis blade brush or clean soft toothbrush
- Clean dry lint-free cloths
- Andis-approved blade cleaner or disinfectant when needed
- Andis clipper oil
- Shallow approved blade-care container if the product requires dipping
- Small tray for guards and screws that are designed for owner removal
- Dry cotton swabs for exterior crevices
- Eye protection when using an aerosol blade-care product
Step-by-step instructions
Step 1: Confirm the clipper and blade system
Read the model's use-and-care document and identify a detachable A-5 style blade, adjustable blade, five-in-one blade or snap-off home-trimmer blade. Note whether the clipper is corded, rechargeable or uses a removable battery. Do not follow a blade-release video for a different mechanism; forcing the hinge, latch or drive can change blade alignment.
Step 2: Turn off and isolate all electrical power
Move away from the animal, switch the clipper off and unplug the cord or remove the battery only if the model permits it. Detach the charging stand. Let a hot blade cool naturally before handling. Never clean while the motor is running, and never use water or aerosol near an energized cord, switch or charger.
Step 3: Brush loose hair from the blade and housing
Hold the clipper with the blade end down and brush hair from the teeth, blade channels, hinge area and attachment-comb rails. Wipe the housing and use a dry cotton swab around seams. On an AGC-style ventless body, do not open the housing to chase a few hairs. Avoid blowing hair deeper into a motor or switch with high-pressure air.
Step 4: Remove the blade by the model's release method
Release a detachable blade with the clipper off as Andis directs, supporting the blade so it cannot fall. A five-in-one or adjustable blade may use a different latch and should not be pried. Brush the exposed blade drive and hinge without bending them. Do not remove factory screws or separate the cutter from the comb unless the care guide specifically describes owner service.
Step 5: Clean and disinfect the blade appropriately
Use an Andis-approved product such as Blade Care Plus or Cool Care Plus according to its label. When a dip method is specified, immerse only the blade portion and keep the clipper body above the liquid; never dip a blade while attached to a cordless housing unless the exact Andis directions permit that method. Brush stubborn packed hair after it softens and observe the required contact time for disinfection.
Step 6: Dry the blade and prevent retained cleaner
Wipe the blade with a clean cloth and let cleaner drain from between the cutter and comb. A water-based rinse, if required by the product, must be followed by thorough drying. Do not reinstall a wet blade on the drive or store it in a sealed case. Check for chipped teeth, orange rust, a warped cutter or a hot spot that indicates replacement or sharpening is due.
Step 7: Oil the correct blade points
Apply a few drops of Andis clipper oil across the blade teeth and at the side rails as shown in the model guide. Reattach the blade correctly, point the clipper downward and run it briefly only after all cleaning solvent has cleared. The moving cutter distributes oil. Wipe excess from the exterior so it cannot transfer heavily to the coat or attract a paste of hair.
Step 8: Clean guards and attachment combs separately
Remove hair from comb teeth and clips. Wash a fully plastic or metal guard with mild soap and water only when its instructions allow, then dry it completely before storage. Inspect for cracked teeth or a loose metal clip that could snag hair. Do not wash an accessory that contains an electronic sensor or attaches permanently to the powered body.
Step 9: Wipe the clipper housing and charging area
Use a clean dry cloth on the body. For a stubborn exterior mark, use only the barely damp method permitted by the Andis document, keeping moisture away from the switch, cord entry, battery contacts and charging socket. Clean charging contacts dry. Do not spray disinfectant into the housing or wrap a damp clipper in a towel.
Step 10: Reassemble, test and store dry
Confirm the blade locks flat and attachment combs seat securely. Run the clipper briefly and listen for normal sound; stop if the blade chatters, pulls, heats rapidly or the drive appears misaligned. Wipe it again, add the blade guard and store the clean, dry tool in its case without a tightly bent cord. Maintain removable batteries as the model manual specifies.
Specific cleaning questions
Open a question for a concise answer about stains, odors, safety, frequency, and troubleshooting.